Introduction
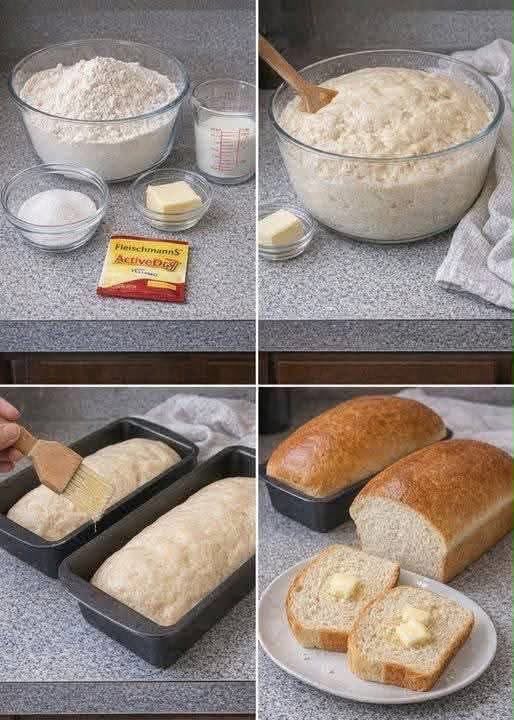
There is something incredibly comforting about the smell of freshly baked bread filling the kitchen. This simple homemade bread recipe produces a soft, tender loaf with a lightly golden crust and a delicious buttery flavor.
The recipe uses everyday ingredients—warm milk, water, yeast, sugar, butter, salt, and flour—yet the result tastes wonderfully fresh and satisfying. Once you learn how easy it is to make bread at home, you may find yourself reaching for this recipe whenever you want a warm loaf straight from the oven.
And when that bread is still warm, spreading a little butter over the top is almost irresistible!
Ingredients
- 1 cup warm milk
- ½ cup warm water
- 2¼ teaspoons active dry yeast
- ¼ cup granulated sugar
- 2 tablespoons butter, melted
- 1 teaspoon salt
- 4–4½ cups all-purpose flour
- Extra melted butter for brushing, optional
Important Ingredient Notes
Milk and water: They should be warm rather than hot. Very hot liquid can interfere with the yeast.
Yeast: Active dry yeast gives the dough its rise and helps create a light, airy texture.
Sugar: Besides adding a subtle sweetness, sugar provides food for the yeast and contributes to browning.
Butter: Melted butter adds richness and tenderness to the bread.
Flour: Begin with 4 cups and add more gradually only if the dough is too sticky to handle.
Instructions
1. Activate the Yeast
In a large mixing bowl, combine the warm milk, warm water, sugar, and active dry yeast.
Stir gently and let the mixture sit for about 5–10 minutes. The yeast should become foamy or bubbly on the surface.
If there is little or no activity, check that your yeast is still fresh and that the liquid wasn’t too hot.
2. Add the Butter and Salt
Add the melted butter and salt to the yeast mixture. Stir until everything is well combined.
3. Add the Flour
Add about 4 cups of flour gradually, mixing as you go.
Once the dough begins to come together, turn it onto a lightly floured surface and begin kneading. If the dough is extremely sticky, add a little of the remaining flour, a tablespoon or two at a time.
Avoid adding too much flour because an overly stiff dough can produce dense bread.
4. Knead the Dough
Knead the dough for approximately 8–10 minutes by hand, or use a dough hook if using a stand mixer.
The finished dough should feel soft, smooth, and elastic. It can be slightly tacky but should not cling heavily to your hands.
5. First Rise
Place the dough in a lightly greased bowl and turn it once so the surface is lightly coated.
Cover the bowl with a clean kitchen towel or plastic wrap.
Let the dough rise in a warm, draft-free place for approximately 1–1½ hours, or until it has roughly doubled in size.
6. Shape the Bread
Gently press down the risen dough to release some of the accumulated air.
Transfer it to a lightly floured surface and shape it into one large loaf or divide it into smaller portions for individual loaves or rolls.
Place the shaped dough into a greased loaf pan or onto a lined baking sheet, depending on the shape you prefer.
7. Second Rise
Cover the shaped dough and let it rest again for approximately 30–45 minutes.
It should become noticeably puffier.
This second rise helps create a lighter, softer texture.
8. Bake
Preheat your oven to 375°F (190°C).
Bake the bread for approximately 25–35 minutes, depending on the size and shape of your loaf.
The bread should be beautifully golden on top and sound somewhat hollow when gently tapped.
9. Finish With Butter
Remove the bread from the oven and immediately brush the top with a little melted butter if desired.
Allow it to cool slightly before slicing.
For the ultimate experience, serve it warm with butter.
The Best Method for Soft Homemade Bread
The secret isn’t complicated—it is mostly about handling the dough correctly.
Start with properly warmed liquids, give the yeast enough time to activate, and add flour gradually. During kneading, develop the gluten without making the dough unnecessarily stiff.
The two rising periods are also important. The first develops flavor and structure, while the second allows the shaped loaf to become light and airy before baking.
Finally, don’t skip the short resting period after baking. Fresh bread continues to release steam as it cools, so cutting it immediately can make the interior seem gummy.
A Brief History of Homemade Bread
Bread is one of the oldest prepared foods in human history. Early forms were simple flatbreads made from grains and water, while naturally fermented breads developed as people discovered that dough could rise and become lighter.
Over centuries, bread-making traditions developed throughout Europe, the Middle East, North Africa, and many other parts of the world.
Modern yeast breads became especially convenient with commercially produced yeast, allowing home bakers to create consistent loaves without relying entirely on naturally occurring fermentation.
Today’s homemade sandwich-style breads combine these traditional principles with convenient modern ingredients, making fresh bread accessible to almost any home kitchen.
Benefits of Making Bread at Home
Homemade bread offers several practical advantages:
- Freshness: You can enjoy bread straight from the oven.
- Simple ingredients: The recipe uses familiar pantry staples.
- Control: You decide what goes into your bread.
- Customizable: The loaf can be made larger, smaller, softer, or more rustic.
- Wonderful aroma: Freshly baked bread creates an inviting kitchen atmosphere.
- Versatility: It can be served with breakfast, soups, sandwiches, dinners, or snacks.
Keep in mind that this is still bread containing flour, sugar, and butter, so nutritional value depends on portion size and the rest of your meal.
Formation and Shaping Ideas
There are several ways to shape this dough.
Classic Loaf
Place the dough into a greased loaf pan for neat slices perfect for sandwiches and toast.
Rustic Round
Shape the dough into a round loaf and bake it on a lined baking sheet for a more rustic appearance.
Dinner Rolls
Divide the dough into small equal pieces, roll them into balls, and arrange them in a greased baking dish. Allow them to rise before baking.
Pull-Apart Bread
Divide the dough into small balls and place them close together in a baking pan. Once baked, the pieces can easily be pulled apart.
Serving Suggestions
Fresh homemade bread is incredibly versatile. Try serving it with:
- Soft butter
- Honey
- Jam or preserves
- Eggs and breakfast dishes
- Soups and stews
- Roasted meats
- Cheese
- Sandwich fillings
- Garlic butter
For a simple comfort-food moment, slice the bread while it is still warm, add butter, and let it melt into the soft crumb.
Storage
Allow the bread to cool completely before storing.
Keep it in an airtight container or bread bag at room temperature for a few days.
For longer storage, wrap the loaf well and freeze it. Thaw at room temperature and warm it gently before serving.
Troubleshooting
My dough isn’t rising:
The yeast may be inactive, the liquid may have been too hot or too cold, or the room may be too cool. Give the dough additional time in a warm, draft-free location.
My bread is dense:
Too much flour or insufficient kneading/rising can contribute to dense bread.
My dough is very sticky:
Add flour gradually rather than adding a large amount at once. A slightly tacky dough is often preferable to a very stiff one.
My crust is browning too quickly:
If the top becomes dark before the bread is finished, loosely cover it with foil for the remaining baking time.
Conclusion
This homemade bread is a wonderful recipe to keep in your kitchen because it transforms a handful of simple ingredients into something warm, fragrant, and comforting.
The combination of soft dough, golden crust, and buttery finish makes it perfect for family breakfasts, sandwiches, dinner tables, or simply enjoying a slice while it is still warm.
Once you experience the aroma of freshly baked bread coming from your own oven, store-bought bread may not feel quite the same again.
For Bread Lovers ❤️
If you love homemade bread, this is the kind of recipe worth saving and making again. The dough is simple, the ingredients are familiar, and the result is wonderfully versatile.
Serve it warm, spread it generously with butter, and enjoy one of the simplest pleasures of home baking.
Comment “Yummy” if you’d like to try this recipe! 🥖❤️